Sunday, December 25, 2011

Merry Christmas! Hot Chocolate on a Stick

Last Christmas, I baked all my family and friends different kinds of cookies as presents, but this year I wanted to do something different. While researching recipes, I ran across a post from Tracey's Culinary Adventures about the best holiday recipes. I had always wanted to make my own marshmallows, but never really had the right recipe. Well, now that I finally had the reason to make marshmallows, I thought it was time to get my own candy thermometer.


A few tips to start:
  • I opted to put both the fudge and marshmallows in a 8x8 pan, since when I first tried it in the 9x13 pan it came out a little thin. 
  • Slide the marshmallow on first from the bottom of the lollipop stick, and leave about an inch for the fudge below it. If you try to slide it on from the top, the marshmallow will get the entire stick messy on the way down. 
  • The fudge must sit for 12 hours, and the marshmallows must sit for 4 hours, so you make both components well before you actually need to assemble it. 
  • As gift wrapping, I put each fudge-marshmallow stick in a clear lollipop bag and tied it with a ribbon. 

Hot Chocolate Fudge
1/2 cup heavy cream
14 oz can (1 1/4 cups) sweetened condensed milk
18 oz (3 cups) bittersweet chocolate (chopped chocolate bars or chips)
4 oz (3/4 cup) unsweetened chocolate, roughly chopped
wooden or lollipop sticks

Directions
Line an 8x8 baking pan with parchment paper or aluminum foil, leaving an overhang on opposite sides so you can lift the chocolate out easily.

In a medium saucepan, heat the cream and condensed milk over medium-low heat until steaming, stirring occasionally. Remove the pan from the heat and add all of the chocolate. Stir gently just to cover the chocolate evenly, then let sit for 10 minutes.

Return the pan to medium-low heat and use a whisk to stir until the chocolate is completely melted. Once melted, whisk vigorously until the mixture is thick and shiny (it won't take long). You can add flavoring at this point if you're so inclined.

Pour the chocolate into the pan and spread it as evenly as you can. Let sit for at least 12 hours so it can set.

Use the foil (or parchment) "handles" to lift the chocolate out of the pan and turn it over (so the top is facing down) onto a cutting board. Remove the foil (or parchment). Slice the chocolate into squares just slightly bigger than 1" on each side.


Homemade Marshmallows 
3 packages unflavored gelatin
1 cup ice cold water, divided
12 ounces granulated sugar, approximately 1 1/2 cups
1 cup light corn syrup
1/4 teaspoon kosher salt
1 teaspoon vanilla extract
1/4 cup confectioners’ sugar
1/4 cup cornstarch
Nonstick spray

Directions
Place the gelatin into the bowl of a stand mixer set up with the whisk attachment along with 1/2 cup of the water.

In a small saucepan combine the remaining 1/2 cup water, granulated sugar, corn syrup and salt. Place over medium high heat, cover and allow to cook for 3 to 4 minutes. Uncover, clip a candy thermometer onto the side of the pan and continue to cook until the mixture reaches 240 degrees F, approximately 7 to 8 minutes. Once the mixture reaches this temperature, immediately remove from the heat.

Turn the mixer on low speed and, while running, slowly pour the sugar syrup down the side of the bowl into the gelatin mixture. Once you have added all of the syrup, increase the speed to high. Continue to whip until the mixture becomes very thick and is lukewarm, approximately 12 to 15 minutes. Add the vanilla during the last minute of whipping. While the mixture is whipping prepare the pans as follows.

Combine the confectioners’ sugar and cornstarch in a small bowl. Lightly spray a 13 by 9-inch metal baking pan with nonstick cooking spray. Add the sugar and cornstarch mixture and move around to completely coat the bottom and sides of the pan. Return the remaining mixture to the bowl for later use.

When ready, pour the mixture into the prepared pan, using a lightly oiled spatula for spreading evenly into the pan. Dust the top with enough of the remaining sugar and cornstarch mixture to lightly cover. Reserve the rest for later. Allow the marshmallows to sit uncovered for at least 4 hours and up to overnight.

Turn the marshmallows out onto a cutting board and cut into 1-inch squares using a pizza wheel dusted with the confectioners’ sugar mixture. Once cut, lightly dust all sides of each marshmallow with the remaining mixture, using additional if necessary. Store in an airtight container for up to 3 weeks.

Source: Makes and Takes, Tracey's Culinary Adventures

Tuesday, December 20, 2011

Peppermint Bark

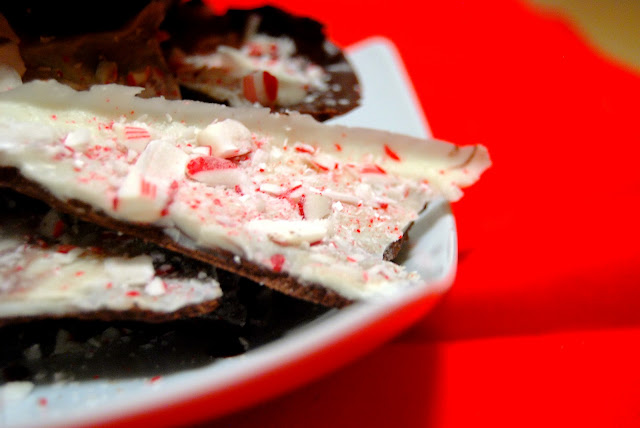
Around this time of year, I inevitably become addicted to peppermint bark. I've never actually had the candy at my house, but instead I go to my friend's house to eat all of hers. However this year, I felt it was only right to try and make my own. And it was well worth the minimal effort. 


Chocolate chips are fairly easy to melt
White chocolate is harder to melt, it burns more easily. 
Spread the chocolate on the cookie pan, and then spread the white chocolate over it to create layers. 
Gorgeous sparkling candy cane crumbles. 
Part of the charm of peppermint bark is the hand-broken pieces. 

Ingredients 
12 ounces semi-sweet chocolate chips 
12 ounces white chocolate chips 
8 peppermint candy canes 

Directions 
1.Unwrap the candy canes and place them in a food processor. Pulse on/off several times for 5-10 seconds each, until the canes have been crushed into small pieces. Alternately, place the candy canes in a large Ziploc bag and seal tightly. Use a rolling pin to roll/smash the candy canes until they are the size you desire.
2. Prepare a cookie sheet by covering it with smooth aluminum foil.
3. Melt or temper the dark chocolate. Pour the chocolate onto the prepared cookie sheet and use an offset spatula or knife to spread it to an even thickness, a little more than 1/8" thick. The chocolate does not have to reach all sides of the sheet, as it will be broken up later anyhow. Place the tray in the ref

4. While the dark chocolate hardens, melt or temper the white chocolate. Stir in most of the candy cane bits, reserving about a quarter of the mixture to put on top.rigerator to firm up while you prepare the white chocolate.

5. Remove the tray from the refrigerator and spread the white chocolate in an even layer over the dark chocolate.

6. While the white chocolate is still wet, sprinkle the remaining candy cane pieces over the entire surface evenly. Press down very slightly to ensure they stick. Place the tray back in the refrigerator to firm up for 30 minutes.

7.Once the peppermint bark bark is completely set, break into small, uneven pieces by hand.


Recipe adapted from here.

Friday, December 9, 2011

Lemon Meringue Cupcakes


I've had my eye on this recipe for a long time, months actually. Always wanting to try it, but never finding the opportunity or guts to attempt the recipe since it was in the "Fancy Cupcakes" section. Intimidating right? Maybe not so much, but if you're having the same doubts, then have no fear, because these are a lot easier than they seem. 

During the cooking process, I briefly forgot about my cupcakes in the oven and left them in a few minutes too long. They weren't burnt, but I like to take my cupcakes out of the oven a little early so that they are still soft and fluffy rather then the dense and hard texture these cupcakes took on. 

The most advanced part of this recipe was the 7 Minute Frosting. I will add a separate post on that later on.  


I've made lemon curd before. It involves a lot of steps but it's well worth the effort since I absolutely love all things lemon, especially lemon curd. This recipe called for a lot of butter, which gave it less of a tart taste and more of a creamy taste.

I would recommend cutting the frosting recipe in half since after I finished piping it on the cupcakes I had more than half the batter left in the bowl, and a lot of frosting still in the bag. 

After piping on the frosting, you use a kitchen torch to brown the frosting. Don't own a kitchen torch? Neither do I. I used the broil setting in my oven. Place the cupcakes on the shelf level closest to the top, and let the flames do their magic. But don't leave them in the oven for too long! Just about 30-45 seconds, or else you will burn your cupcakes. The entire time I was stressed I was going to ruin them (some of them did catch on fire, like a marshmallow), but they ended up alright. 


Ingredients

3 cups all-purpose flour
1 tablespoon baking powder
1/2 teaspoon salt
1 cup (2 sticks) unsalted butter, room temperature
2 cups sugar
4 large eggs, room temperature
Finely grated zest of 3 lemons (about 3 tablespoons), plus 2 tablespoons fresh lemon juice
1 teaspoon pure vanilla extract
1 cup buttermilk
Lemon Curd
Seven-Minute Frosting


Directions

Preheat oven to 325 degrees. Line standard muffin tins with paper liners. Whisk together flour, baking powder, and salt. 

With an electric mixer on medium-high speed, cream butter and sugar until pale and fluffy. Add eggs, one at a time, beating until each is until incorporated, scraping down sides of bowl as needed. Beat in zest and vanilla. Add flour mixture in three batches, alternating with two additions of buttermilk and lemon juice, and beating until just combined after each.

Divide batter evenly among lined cups, filling each three-quarters full. Bake, rotating tins halfway through, until golden brown and a cake tester inserted in centers comes out clean, about 25 minutes. 

Transfer tins to wire racks to cool completely before removing cupcakes. Cupcakes can be stored overnight at room temperature, or frozen up to 2 months, in airtight containers. 

To finish, spread 1 tablespoon lemon curd onto middle of each cupcake. Fill a pastry bag fitted with a large open-star tip with frosting. Pipe frosting onto each cupcake, swirling tip slightly and releasing as you pull up to form a peak. Hold a small kitchen torch 3 to 4 inches from surface of frosting, and wave it back and forth until frosting is lightly browned all over. Serve immediately. 


Sunday, December 4, 2011

Raspberry Lemon Bars


I was looking for a recipe for cooking club the other week, when I ran across this one. It didn't fit the theme for that week, but that didn't stop me from book-marking it, eager to try it as soon as I could. While I've always been a fan of lemon bars, this version is now by far my favorite. I was worried that the lemon flavor might overpower the raspberry, but I was pleasantly surprised at how much both were present in the end product.

The crust was satisfactory, but didn't add much flavor to the dessert. This was a good thing, because it allowed the lemon-raspberry filling to be center-stage. When it came time to pour the raspberry-lemon filling over the crust, the mixture was extremely watery, so I was slightly skeptical. Not to worry though, the filling did actually set, and in fact became the perfect consistency. 


Raspberry Lemonade Bars
Yield: about 24-30 bars*
Ingredients:


For the crust:
2¼ sticks (18 tbsp.) unsalted butter, at room temperature
½ cup sugar
2 cups all-purpose flour
½ tsp. salt
For the raspberry lemon layer:
3 cups sugar
1 1/3 cups all-purpose flour
3 tbsp. lemon zest
¼ tsp. salt
3 cups frozen raspberries, thawed
6 large egg whites
2 large eggs
1 1/3 cups freshly squeezed lemon juice
Confectioners’ sugar, for dusting
*I halved the recipe and baked it in an 8 x 8-inch baking pan with a slightly reduced baking time. 
Directions:
Preheat the oven to 350˚ F.  Line a 9 x 13-inch baking pan with parchment paper. In the bowl of an electric mixer, combine the butter and sugar.  Beat on medium-high speed until smooth, 1-2 minutes. With the mixer on low speed, mix in the flour and salt just until incorporated. Add the dough to the prepared baking pan. Press into an even layer over the bottom of the pan. Bake for about 25 minutes or until light golden brown. Remove from the oven, maintaining the temperature.
While the crust is baking, make the top layer. Combine the sugar, flour, lemon zest and salt in a large bowl and whisk to blend. Add the raspberries to a fine mesh sieve and press through, mashing with a spatula, to extract as much juice and pulp as possible, straining out the seeds. Add the egg whites and eggs to the bowl with the dry ingredients and whisk well to blend. Whisk in the raspberry puree and lemon juice until smooth.
Pour the mixture over the crust and bake until the center is just set and not longer jiggles when gently shaken, about 35-40 minutes. Transfer to a wire rack to cool to room temperature. Cover and chill well in the refrigerator, at least 2 hours. When ready to serve, use the parchment paper to lift the bars from the pan. Place on a cutting board and slice into bars. Dust the tops with confectioners’ sugar if desired.
Source: slightly adapted from Annie's Eats.

Friday, November 4, 2011

Happy Halloween! Eyeball Cupcakes

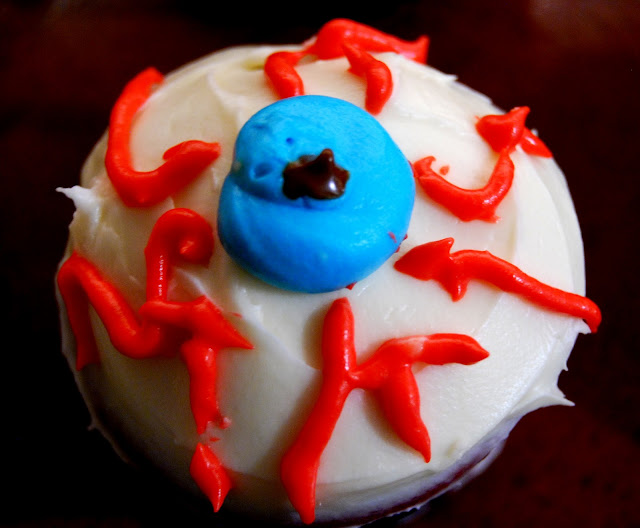
To celebrate all things ghoulish and creepy on Halloween, I decided to make eyeball cupcakes. Freaky, right?

 I started with a Red Velvet cupcake. Making the eyeballs was surprisingly easy.

 Step 1: Cover the cupcakes in a smooth white frosting.

 Step 2: Using a frosting bag (small-medium sized tip), make a circle in the middle of the cupcake, the "iris"  using frosting that you've dyed blue.

 Step 3: Also using a frosting bag (with a very small tip), pipe the "veins" around the blue "iris", using frosting that you've dyed red. Finish off by melting a little chocolate and adding a dot in the middle as the "pupil."


If you don't have a frosting bag, you can probably use the gel decorating icing in the tube.

I got the idea from the blog Dinner: A Love Story.

Happy Birthday Papa!

On their wedding day, my dad asked my mom for only one thing. My dad told my mom that he had had a cake on all of his birthdays, and would like a cake on all of his birthdays to come. This year as a gift, I wanted to bake him his very own cake. 

This recipe is very similar to my Chocolate Salted Caramel Cupcakes, but instead its in cake form. When assembling the cake, you are supposed to slice the layers so that you end up with four layers, but I was running out of time so I skipped this step. If I hadn't, the cake would have been better since the caramel would have soaked into the cake.


I finished the cake of with a dark chocolate caramel ganache, which was extremely rich. I prefer this recipe in cupcake form, but I want to try this again with more time. 

I used this recipe.

Peach Crumble Bars

It has taken me a long time to get this up here, but here they are, finally. 
The other week for Cooking Club, the theme was fruit. I had a few frozen bags of peaches hiding in the back of my freezer just waiting to be used, so I found a recipe for Peach Crumble Bars


The recipe starts with the crumble, which has a satisfying buttery flavor. Once you grease your pan, you have to press about half of the dough into the bottom to create a flat base layer. 


I used frozen peaches, which worked just fine, though the recipe calls for fresh cut peaches. I love the combination of nutmeg with peaches in this recipe. The peaches go on top of the base. 


Crumble the remaining half of the dough on top of the peaches.

                       
I was expecting chunks of peaches in the final product, but during the baking process, they lost their shape and became softer. It wasn't bad, but I wish they had the texture of the peaches. 


The original recipe uses a 9x13 inch pan, but I only had an 8x8.  To accommodate the size difference, I cut the recipe in half, which worked out perfectly. While this was  not my favorite outcome, I want to play with different fruits in the future and see if I can perfect the recipe. 

Tuesday, September 27, 2011

Eggs in a Basket

I'm usually not a huge breakfast fan, but who doesn't love lazily waking up on a Sunday morning and beginning the day with a delicious brunch? For my Sunday Brunch I decided to cook Eggs in a Basket (also known as bird's nest, eggs in a hole etc.) This is a recipe I had always heard about but never imagined attempting. That was until one of my friends told me just how delicious it was and how easy to make. It was so easy, she said, that she often made this for herself for breakfast during her busy morning schedule! 


First you start by cutting the hole out of the bread. You can basically use any kind of bread, but I opted for peasant bread because I love the texture. Remember to save the piece you cut out! It turns into one of the most heavenly things I've ever tasted.


Then you melt butter in your pan and fry the piece of bread and the hole for about a minute before adding the egg, along with a little salt and pepper. You will eventually flip the entire piece of toast with the egg once it is mostly set.

Rosemary made it taste even better!


I like my eggs runny, so I let it cook on the other side for a only little longer before sliding it on to the plate. The hole, which you fry along with the toast, ends up being perfectly toasted and extremely buttery, an excellent accent with a sprig of grapes. Overall, a delicious brunch! 

For this easy recipe, just follow the link here.

Monday, September 19, 2011

Apple Cider Doughnuts

It's finally autumn! While I'm sad to be leaving behind those hazy summer days, there's something about autumn weather that makes me think of apples, warm colors and new beginnings. What celebrates that more than apple cider doughnuts?

The doughnuts before they were fried. 

Making the actual dough was seriously simple. It was the repetitive rolling and chilling and cutting that took so long. I bought a circular cookie cutter instead of a doughnut cutter and cut the holes out by hand.  

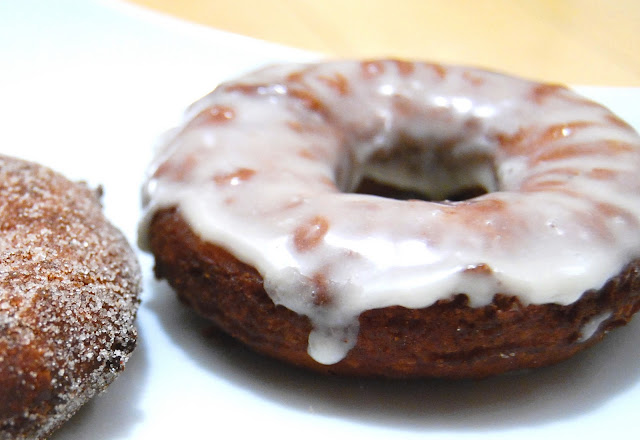
The doughnuts after they were fried. They rose a lot while they cooked.

I'm usually terrified of frying foods, but this was surprisingly easy. Once the oil or shortening is heated up, everything cooks relatively quickly. In fact I burned a few because I didn't turn them in time.

The delicious glaze!

The recipe gives you two options for topping; an apple cider glaze and cinnamon sugar. I opted to try both. I've never tried a glaze for this kind of doughnut, but I prefered it. I usually have them with the cinnamon sugar.

Cinnamon sugar--the usual. 


All in all, the doughnuts didn't turn out quite as light and fluffy as I expected, but I still had a lot of fun trying! Thanks again to smitten kitchen for the recipe.

Wednesday, September 14, 2011

I'm Back!

I know I've been missing for the summer months, but now that it's fall and I'm finally back home, I'm getting back into the kitchen! I was at my camp this past summer, working as a Counselors Aide to kids, sleeping in platform tents in the woods. While I had the best summer of my life, I did miss the opportunity to work in my kitchen. 

From Savy Cafe 

Keep an eye out for updates! 

Wednesday, June 8, 2011

Happy Birthday Mama!

For my Mom's birthday, I wanted to bake her a special cake, one I had never made before. So I searched and searched every website I could think of until I ran across smitten kitchen's recipe for the best birthday cake.


The recipe called for a classic yellow cake (and I must add this yellow cake recipe has become a new staple in my kitchen) with a chocolate frosting that was made with sour cream, instead of butter.


It wasn't typical of chocolate frosting that I have made before. The chocolate taste was mild, and it had a slightly sour aftertaste (from the sour cream, I think). It wasn't what I expected, but was still pretty good, especially the day after. I would opt for a different frosting next time, but I'm glad I tried this one.

Sunday, May 1, 2011

Happy First Birthday!

I didn't update on the actual day, but Easter was officially my first year anniversary of this blog! Hard to believe it's been an entire year since my first blog post, but I'm still definitely looking forward to improving my skills even further.

Instead of doing an Easter themed post (I was rather busy on the actual day this year), I decided to celebrate spatula's birthday with simple, fun cupcakes. I usually prefer the classic vanilla cupcake with vanilla buttercream frosting, which is why I chose to make these.

The colorful sprinkles against the white frosting are gorgeous, and add a festive touch to the cupcake.

Thursday, April 21, 2011

Key Lime Bars

This post is way overdue, but here it finally is.

The theme for cooking club on Monday was Martha Stewart. I could not have been more excited about this, but I still struggled to find a recipe I really wanted to try, since I haven't baked anything new in awhile. But finally, I found the recipe for Key Lime Bars, and I was eager to get back in the kitchen again.

These bars were fairly simple, and had the perfect tart lime flavor that I love. 

Sunday, March 13, 2011

Poached Eggs

So I'll admit, I didn't actually make these. In fact, my brother (who came home for spring break this weekend) was the one who did. I've only ever tried to poach eggs once before, and let me tell you, it was not successful. So congrats to my brother for getting it on the first try. I did, however, style the plate with black pepper and basil. 


He looked up the instructions online and found the very helpful article How to Poach an Egg. I didn't actually get to taste them because I had to leave for an appointment, but I was told by my family that they were fantastic. 

Sunday, February 27, 2011

Tres Leches Cupcakes with Dulce de Leche Buttercream Frosting

Tres Leches cake is a Spanish recipe. You make a fluffy sponge or buttercake and soak that in three types of milk—evaporated milk, condensed milk, and either heavy cream or coconut milk (which I used). You can also soak it in alcohol. 


The cake was fairly easy, and the batter tasted delicious. Similar to the souffle, the batter required whipped egg whites, which kept the cake from becoming soggy when being soaked in the milks.


The frosting was also very delicious, sweet, but not overly so. When I was cooking the frosting, some of it burned and stuck to the outside of the saucepan, but the majority of the burn was removed during the straining step. The frosting took longer to make than the cake did though, and while I would definitely make this frosting again, I would save it for a day when I have a lot of time. 

I got this recipe from the Food Network. 

Chocolate Souffle

This was my first time making any type of souffle. I have to say, I was pretty nervous since every time I saw a souffle in a movie it always turned out to be a disaster and deflated straight out of the oven. With that image in mind, I tried my first souffle.

The recipe I used was a light recipe, from Weight Watcher's, here. I was a little nervous about going the light route for my first time, but I decided to try it out anyway.

What makes a souffle a souffle is the whipped egg whites, which make the cake fluff up in the oven. When I took my souffle out of the oven, it eventually fell. I tried to catch pictures before they fell too much, because when they first came out, they were extremely fluffy. Next time, I will take the picture straight out of the oven.


When I did more research, I found out that all souffles eventually fall due to the fact that the cold air compresses the bubbles within the cake. So my souffle wasn't that disastrous after all. And it tasted good, even though I might try a more chocolaty recipe next time. 

Tuesday, February 8, 2011

Snickers Caramel Cheesecake Cookies

A few weeks ago, my friend sent me a link to this recipe, which looked absolutely delicious to me. The only problem? I didn't have a "muffin top pan."

I had never heard of such a pan before, so I researched it online, and found out that its purpose is exactly what it seems: instead of baking the whole muffin, this pan allows you to only bake the top of a muffin, which is usually the preferred part. Not only can you use this for muffin recipes, but you may also use it for a wide variety of other recipes (which I fully intend to do). I ended up ordering this one, and I am very excited to discover everything I can do with it.

My first recipe with this pan was the Snickers Caramel Cheesecake Cookies. This should have been a very easy, fun and rewarding recipe, but everything possible went wrong for me last night.


I had to run to the store several times in the middle of the preparation for things I thought were in the house, but weren't. I also ended up ruining the first crust and having to make another one, and ultimately I didn't get enough cream cheese, but decided that I did not want to go to the store for the fourth time. Because of this, the cookie turned out to be very sweet, because the sugar was doubled for the amount of cream cheese I used.


In spite of all the problems I had, I think the cookie turned out fairly well. I am definitely going to make it again, hopefully the process will go more smoothly.

Wednesday, February 2, 2011

Oreo Cupcakes

Whenever I go to Crumbs bakery, I usually get the Oreo cupcake. So I was eager to try this recipe that I ran across online.


I got the recipe for the cake from another blog. This is the link. The recipe for the icing seemed good also, but I wasn't sure it would hold up for the next day.
The cake was a tiny bit dry, and next time I would opt for a recipe with a stronger chocolate flavor.


I ended up using the icing recipe from a different blog. It came out a little dry and stiff. Next time, I would add a little more water. The taste reminded me a lot of the frosting in actual Oreo cookies however, so that was good.

Overall, I had a lot of fun making these cupcakes, and I recommend trying this recipe.

Wednesday, January 12, 2011

Chocolate Salted Caramel Cupcakes

Today we had a snowday! I decided to spend my time off trying out a new recipe, Chocolate-Salted Caramel Cupcakes.


For this recipe, there were a few components to make. There was the chocolate cupcake, the caramel, and the dark chocolate frosting.
The cake was an easy recipe, and had a rich chocolate flavor.
This was the first time I've ever made caramel by myself, so I was a little worried about doing it wrong, but I think it came out really well.
Finally, there was the frosting. The frosting called for a lot of butter, but I ended up with way too much frosting. Next time I would recommend cutting the recipe in half.


I found the recipe on the blog 52 Cupcakes, but the recipe is from Martha Stewart. Here is the link for the whole recipe.


Thursday, January 6, 2011

December

So, I haven't been updating recently. I've been busy on vacation and now I'm back at school doing work. 
However I never stopped baking. 

For Christmas, instead of buying everyone presents, I baked them a box of cookies. 
The three types of Christmas cookies. 


I have also been baking other things. I made a yellow cake with creamy vanilla buttercream frosting, peach-blueberry pie, and my brother's favorite, oatmeal raisin cookies. I've also been starting to cook dinner occasionally for my family.

I am going to try out more new recipes, and I will make an effort to share it on my blog.