Wednesday, February 22, 2012

Happy Valentine's Day! Conversation Heart Cake Pops

Has anyone else noticed the recent trend in cake pops? It seems as if they are beginning to pop up (pun intended haha) everywhere I turn. Cake pops are very convenient, and are an ideal portion size for a sweet treat. While they have a reputation of being very complicated and hard to master, you shouldn't worry. Even the beginner chef can master this recipe by breaking the whole process into small steps. Dipping is the hardest part. The candy melt mixture may not be smooth when you first take it out of the microwave, but when you stir the coating, the heat from the chips will melt the other chunks, and you will avoid burning your candy melts. 


Things You’ll Need
Mixing bowls
Heart-shaped candy mold
Lollipop sticks

Red Velvet Cake Pops 
1 sheet red velvet cake, baked (1 box)
About 1 cup cream cheese frosting
Candy Melts (I used pink, orange, and purple)
Writing Icing (I used red)

Directions:
Prepare cake mix according to the package instructions. Allow cake to cool completely.
Once cooled, crumble the cake into a large mixing bowl. Add about 1 cup cream cheese frosting and mix thoroughly.

Press cake and frosting mixture into the heart-shaped mold and chill in the freezer for about one hour. Pop the heart shapes out of the mold onto a cookie sheet. Insert lollipop sticks into hearts, and place in freezer for about another 30 minutes.

Microwave candy melts for one minute. Once done, stir until all the chips have melted so that the candy coating is smooth.

Dip the cake pop into the melted candy coating. Once the cake pop is completely covered, slowly turn the cake pop in the melted candy to avoid uneven drips on the surface of the cake pop. Put cake pop in the freezer for about a minute to allow coating to harden.

When the coating has hardened, use the writing icing to write cute “conversation heart” messages on the front of the heart (Too Cute, Hug Me, Love You). Allow icing to harden.


For candy melts, heart shaped pan, and lollipop sticks, check out the nearest Michael’s store, or a cake supply store.


Sunday, December 25, 2011

Merry Christmas! Hot Chocolate on a Stick

Last Christmas, I baked all my family and friends different kinds of cookies as presents, but this year I wanted to do something different. While researching recipes, I ran across a post from Tracey's Culinary Adventures about the best holiday recipes. I had always wanted to make my own marshmallows, but never really had the right recipe. Well, now that I finally had the reason to make marshmallows, I thought it was time to get my own candy thermometer.


A few tips to start:
  • I opted to put both the fudge and marshmallows in a 8x8 pan, since when I first tried it in the 9x13 pan it came out a little thin. 
  • Slide the marshmallow on first from the bottom of the lollipop stick, and leave about an inch for the fudge below it. If you try to slide it on from the top, the marshmallow will get the entire stick messy on the way down. 
  • The fudge must sit for 12 hours, and the marshmallows must sit for 4 hours, so you make both components well before you actually need to assemble it. 
  • As gift wrapping, I put each fudge-marshmallow stick in a clear lollipop bag and tied it with a ribbon. 

Hot Chocolate Fudge
1/2 cup heavy cream
14 oz can (1 1/4 cups) sweetened condensed milk
18 oz (3 cups) bittersweet chocolate (chopped chocolate bars or chips)
4 oz (3/4 cup) unsweetened chocolate, roughly chopped
wooden or lollipop sticks

Directions
Line an 8x8 baking pan with parchment paper or aluminum foil, leaving an overhang on opposite sides so you can lift the chocolate out easily.

In a medium saucepan, heat the cream and condensed milk over medium-low heat until steaming, stirring occasionally. Remove the pan from the heat and add all of the chocolate. Stir gently just to cover the chocolate evenly, then let sit for 10 minutes.

Return the pan to medium-low heat and use a whisk to stir until the chocolate is completely melted. Once melted, whisk vigorously until the mixture is thick and shiny (it won't take long). You can add flavoring at this point if you're so inclined.

Pour the chocolate into the pan and spread it as evenly as you can. Let sit for at least 12 hours so it can set.

Use the foil (or parchment) "handles" to lift the chocolate out of the pan and turn it over (so the top is facing down) onto a cutting board. Remove the foil (or parchment). Slice the chocolate into squares just slightly bigger than 1" on each side.


Homemade Marshmallows 
3 packages unflavored gelatin
1 cup ice cold water, divided
12 ounces granulated sugar, approximately 1 1/2 cups
1 cup light corn syrup
1/4 teaspoon kosher salt
1 teaspoon vanilla extract
1/4 cup confectioners’ sugar
1/4 cup cornstarch
Nonstick spray

Directions
Place the gelatin into the bowl of a stand mixer set up with the whisk attachment along with 1/2 cup of the water.

In a small saucepan combine the remaining 1/2 cup water, granulated sugar, corn syrup and salt. Place over medium high heat, cover and allow to cook for 3 to 4 minutes. Uncover, clip a candy thermometer onto the side of the pan and continue to cook until the mixture reaches 240 degrees F, approximately 7 to 8 minutes. Once the mixture reaches this temperature, immediately remove from the heat.

Turn the mixer on low speed and, while running, slowly pour the sugar syrup down the side of the bowl into the gelatin mixture. Once you have added all of the syrup, increase the speed to high. Continue to whip until the mixture becomes very thick and is lukewarm, approximately 12 to 15 minutes. Add the vanilla during the last minute of whipping. While the mixture is whipping prepare the pans as follows.

Combine the confectioners’ sugar and cornstarch in a small bowl. Lightly spray a 13 by 9-inch metal baking pan with nonstick cooking spray. Add the sugar and cornstarch mixture and move around to completely coat the bottom and sides of the pan. Return the remaining mixture to the bowl for later use.

When ready, pour the mixture into the prepared pan, using a lightly oiled spatula for spreading evenly into the pan. Dust the top with enough of the remaining sugar and cornstarch mixture to lightly cover. Reserve the rest for later. Allow the marshmallows to sit uncovered for at least 4 hours and up to overnight.

Turn the marshmallows out onto a cutting board and cut into 1-inch squares using a pizza wheel dusted with the confectioners’ sugar mixture. Once cut, lightly dust all sides of each marshmallow with the remaining mixture, using additional if necessary. Store in an airtight container for up to 3 weeks.

Source: Makes and Takes, Tracey's Culinary Adventures

Tuesday, December 20, 2011

Peppermint Bark

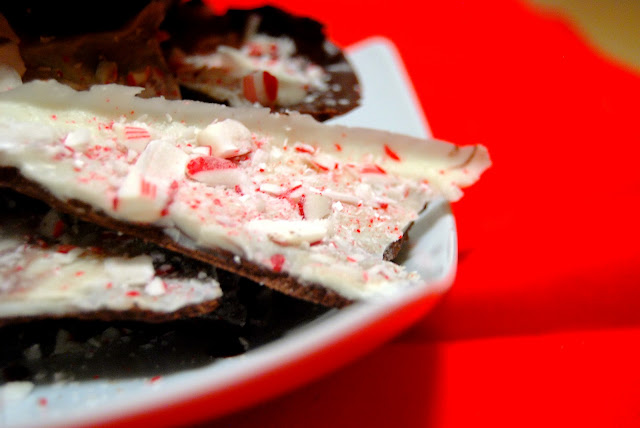
Around this time of year, I inevitably become addicted to peppermint bark. I've never actually had the candy at my house, but instead I go to my friend's house to eat all of hers. However this year, I felt it was only right to try and make my own. And it was well worth the minimal effort. 


Chocolate chips are fairly easy to melt
White chocolate is harder to melt, it burns more easily. 
Spread the chocolate on the cookie pan, and then spread the white chocolate over it to create layers. 
Gorgeous sparkling candy cane crumbles. 
Part of the charm of peppermint bark is the hand-broken pieces. 

Ingredients 
12 ounces semi-sweet chocolate chips 
12 ounces white chocolate chips 
8 peppermint candy canes 

Directions 
1.Unwrap the candy canes and place them in a food processor. Pulse on/off several times for 5-10 seconds each, until the canes have been crushed into small pieces. Alternately, place the candy canes in a large Ziploc bag and seal tightly. Use a rolling pin to roll/smash the candy canes until they are the size you desire.
2. Prepare a cookie sheet by covering it with smooth aluminum foil.
3. Melt or temper the dark chocolate. Pour the chocolate onto the prepared cookie sheet and use an offset spatula or knife to spread it to an even thickness, a little more than 1/8" thick. The chocolate does not have to reach all sides of the sheet, as it will be broken up later anyhow. Place the tray in the ref

4. While the dark chocolate hardens, melt or temper the white chocolate. Stir in most of the candy cane bits, reserving about a quarter of the mixture to put on top.rigerator to firm up while you prepare the white chocolate.

5. Remove the tray from the refrigerator and spread the white chocolate in an even layer over the dark chocolate.

6. While the white chocolate is still wet, sprinkle the remaining candy cane pieces over the entire surface evenly. Press down very slightly to ensure they stick. Place the tray back in the refrigerator to firm up for 30 minutes.

7.Once the peppermint bark bark is completely set, break into small, uneven pieces by hand.


Recipe adapted from here.

Friday, December 9, 2011

Lemon Meringue Cupcakes


I've had my eye on this recipe for a long time, months actually. Always wanting to try it, but never finding the opportunity or guts to attempt the recipe since it was in the "Fancy Cupcakes" section. Intimidating right? Maybe not so much, but if you're having the same doubts, then have no fear, because these are a lot easier than they seem. 

During the cooking process, I briefly forgot about my cupcakes in the oven and left them in a few minutes too long. They weren't burnt, but I like to take my cupcakes out of the oven a little early so that they are still soft and fluffy rather then the dense and hard texture these cupcakes took on. 

The most advanced part of this recipe was the 7 Minute Frosting. I will add a separate post on that later on.  


I've made lemon curd before. It involves a lot of steps but it's well worth the effort since I absolutely love all things lemon, especially lemon curd. This recipe called for a lot of butter, which gave it less of a tart taste and more of a creamy taste.

I would recommend cutting the frosting recipe in half since after I finished piping it on the cupcakes I had more than half the batter left in the bowl, and a lot of frosting still in the bag. 

After piping on the frosting, you use a kitchen torch to brown the frosting. Don't own a kitchen torch? Neither do I. I used the broil setting in my oven. Place the cupcakes on the shelf level closest to the top, and let the flames do their magic. But don't leave them in the oven for too long! Just about 30-45 seconds, or else you will burn your cupcakes. The entire time I was stressed I was going to ruin them (some of them did catch on fire, like a marshmallow), but they ended up alright. 


Ingredients

3 cups all-purpose flour
1 tablespoon baking powder
1/2 teaspoon salt
1 cup (2 sticks) unsalted butter, room temperature
2 cups sugar
4 large eggs, room temperature
Finely grated zest of 3 lemons (about 3 tablespoons), plus 2 tablespoons fresh lemon juice
1 teaspoon pure vanilla extract
1 cup buttermilk
Lemon Curd
Seven-Minute Frosting


Directions

Preheat oven to 325 degrees. Line standard muffin tins with paper liners. Whisk together flour, baking powder, and salt. 

With an electric mixer on medium-high speed, cream butter and sugar until pale and fluffy. Add eggs, one at a time, beating until each is until incorporated, scraping down sides of bowl as needed. Beat in zest and vanilla. Add flour mixture in three batches, alternating with two additions of buttermilk and lemon juice, and beating until just combined after each.

Divide batter evenly among lined cups, filling each three-quarters full. Bake, rotating tins halfway through, until golden brown and a cake tester inserted in centers comes out clean, about 25 minutes. 

Transfer tins to wire racks to cool completely before removing cupcakes. Cupcakes can be stored overnight at room temperature, or frozen up to 2 months, in airtight containers. 

To finish, spread 1 tablespoon lemon curd onto middle of each cupcake. Fill a pastry bag fitted with a large open-star tip with frosting. Pipe frosting onto each cupcake, swirling tip slightly and releasing as you pull up to form a peak. Hold a small kitchen torch 3 to 4 inches from surface of frosting, and wave it back and forth until frosting is lightly browned all over. Serve immediately. 


Sunday, December 4, 2011

Raspberry Lemon Bars


I was looking for a recipe for cooking club the other week, when I ran across this one. It didn't fit the theme for that week, but that didn't stop me from book-marking it, eager to try it as soon as I could. While I've always been a fan of lemon bars, this version is now by far my favorite. I was worried that the lemon flavor might overpower the raspberry, but I was pleasantly surprised at how much both were present in the end product.

The crust was satisfactory, but didn't add much flavor to the dessert. This was a good thing, because it allowed the lemon-raspberry filling to be center-stage. When it came time to pour the raspberry-lemon filling over the crust, the mixture was extremely watery, so I was slightly skeptical. Not to worry though, the filling did actually set, and in fact became the perfect consistency. 


Raspberry Lemonade Bars
Yield: about 24-30 bars*
Ingredients:


For the crust:
2¼ sticks (18 tbsp.) unsalted butter, at room temperature
½ cup sugar
2 cups all-purpose flour
½ tsp. salt
For the raspberry lemon layer:
3 cups sugar
1 1/3 cups all-purpose flour
3 tbsp. lemon zest
¼ tsp. salt
3 cups frozen raspberries, thawed
6 large egg whites
2 large eggs
1 1/3 cups freshly squeezed lemon juice
Confectioners’ sugar, for dusting
*I halved the recipe and baked it in an 8 x 8-inch baking pan with a slightly reduced baking time. 
Directions:
Preheat the oven to 350˚ F.  Line a 9 x 13-inch baking pan with parchment paper. In the bowl of an electric mixer, combine the butter and sugar.  Beat on medium-high speed until smooth, 1-2 minutes. With the mixer on low speed, mix in the flour and salt just until incorporated. Add the dough to the prepared baking pan. Press into an even layer over the bottom of the pan. Bake for about 25 minutes or until light golden brown. Remove from the oven, maintaining the temperature.
While the crust is baking, make the top layer. Combine the sugar, flour, lemon zest and salt in a large bowl and whisk to blend. Add the raspberries to a fine mesh sieve and press through, mashing with a spatula, to extract as much juice and pulp as possible, straining out the seeds. Add the egg whites and eggs to the bowl with the dry ingredients and whisk well to blend. Whisk in the raspberry puree and lemon juice until smooth.
Pour the mixture over the crust and bake until the center is just set and not longer jiggles when gently shaken, about 35-40 minutes. Transfer to a wire rack to cool to room temperature. Cover and chill well in the refrigerator, at least 2 hours. When ready to serve, use the parchment paper to lift the bars from the pan. Place on a cutting board and slice into bars. Dust the tops with confectioners’ sugar if desired.
Source: slightly adapted from Annie's Eats.

Friday, November 4, 2011

Happy Halloween! Eyeball Cupcakes

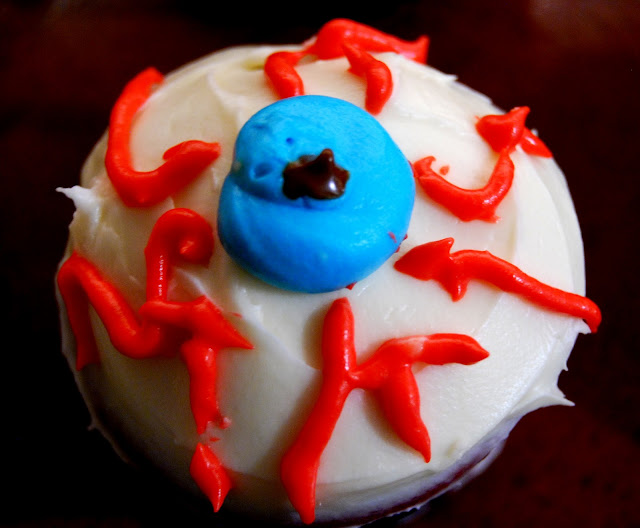
To celebrate all things ghoulish and creepy on Halloween, I decided to make eyeball cupcakes. Freaky, right?

 I started with a Red Velvet cupcake. Making the eyeballs was surprisingly easy.

 Step 1: Cover the cupcakes in a smooth white frosting.

 Step 2: Using a frosting bag (small-medium sized tip), make a circle in the middle of the cupcake, the "iris"  using frosting that you've dyed blue.

 Step 3: Also using a frosting bag (with a very small tip), pipe the "veins" around the blue "iris", using frosting that you've dyed red. Finish off by melting a little chocolate and adding a dot in the middle as the "pupil."


If you don't have a frosting bag, you can probably use the gel decorating icing in the tube.

I got the idea from the blog Dinner: A Love Story.

Happy Birthday Papa!

On their wedding day, my dad asked my mom for only one thing. My dad told my mom that he had had a cake on all of his birthdays, and would like a cake on all of his birthdays to come. This year as a gift, I wanted to bake him his very own cake. 

This recipe is very similar to my Chocolate Salted Caramel Cupcakes, but instead its in cake form. When assembling the cake, you are supposed to slice the layers so that you end up with four layers, but I was running out of time so I skipped this step. If I hadn't, the cake would have been better since the caramel would have soaked into the cake.


I finished the cake of with a dark chocolate caramel ganache, which was extremely rich. I prefer this recipe in cupcake form, but I want to try this again with more time. 

I used this recipe.